
|
|
|
Take everything you read here with a grain of salt; these are things that have worked for me personally, and so I thought I would share them. In some cases, it involves power-tools on the advice of strangers. I can bear no responsibility for your own results. :-) That all being said, read on! |
|
TFs are important to you, otherwise you wouldn't be reading this in the first place. And the type of care you provide to your TF will determine how long you keep it. If mom and dad are buying these toys for you to play with, stop reading now. Come back in a decade. Enjoy endless hours of playtime with them, and don't worry about breaking them or scraping them up. It's a TOY. That's what you do. In fact, I recommend you tell mom and dad to buy MORE, so you can break one with a hammer, and have another one to break with a hammer at a later date... For you age 20 and older types, read on to learn how to keep these toys for a lifetime. This first section is for loose TFs. Read about what to do with a packaged TF in a later section below. Care of: Much of how you need to care for the TF depends on how it was before you got it. If it was bought, opened, and stuck on a top shelf for a few years, you are in luck. Buy a can of cfc-free, non-flammable, canned air. This is the stuff that you can pick up at an electronics store for a few bucks. Make sure to hold the can upright, and spray. If you tilt the can, the propellant comes out. If you bought the stuff I suggested, you shouldn't have any problem. If you tried to save a few bucks, and bought the cheap can of air, the propellant will eat away at plastic, metal, paint, and stickers. You will have wrecked your TF. Don't say I didn't warn you! Obviously, you can simply wipe the dust off your toy, but consider: just wiping dirt off your car scratches the finish. Same happens to TFs. Some people like to be anal-retentive. :-) Did some dust actually stick? Still feel you need to do a bit more cleaning? Perhaps in a small area? Use a small, soft-bristled brush to knock loose the dust while spraying air. If you're still not satisfied, use a q-tip with a dab of water on one end, and carefully wipe inside the crevices. Make sure to use the other end to dry it. Don't leave water behind. If it's a bigger TF, get one of the specialized dry-wipes you use for a cd. Papertowel scratches; yuck. Not much, but I'm picky. If it was some type of sticky residue, get one of the plastic-tipped chamois from the same place you bought the canned air. And pick up a small bottle of vcr tape-head cleaner. It's about the mildest stuff you can get that will clean up the gook and not mess up your TF. Make sure to go back and clean off the tape-head-cleaner residue with a water-soaked q-tip, (or chamois) and dry. Some people have taken to using the lemon-scented clorox wipes. They clean off the gunk, but sometimes leave material strands (which you can blow off when dry). TF needs a shine? It should be naturally shiny. Did you remember to wash off the tape-head cleaner residue with water? If so, then you can temporarially restore the shine by using polish. Be sure not to use anything petro-based, as this will destroy some plastics. Repair of: A TF's shine, simple parts repairs, Advanced parts repairs, sticker repair and replacement...even reconstructing boxes and inserts! You name it, there's a method for doing it. It's different for every TF. Here are some basics below.
Sticker Repair and Replacement: Sticker repair and replacement: Did you read the care-of section on this? If you care for the sticker, you won't have to repair it. About the only repair you can do is place some new double-sided sticky on it, and re-attach it (assuming it isn't ripped). Replacement with original is no-longer commonplace, as suppies of 15+ year-old sticker sheets are dwindling. :-) You could buy a reissue toy for the sticker sheet, but that seems expensive. Delta Star (repolabels) makes excellent cost-effective replacements now. I've purchased some of the Sticker Restoration Kits, and I find them to be highly useful. They even have the factory-only labels! In most cases, these are better than the originals. Give them a shot. Reconstructing Boxes and Inserts:
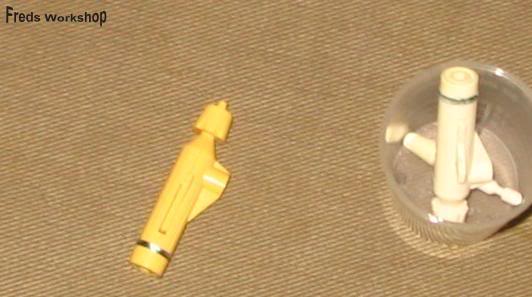
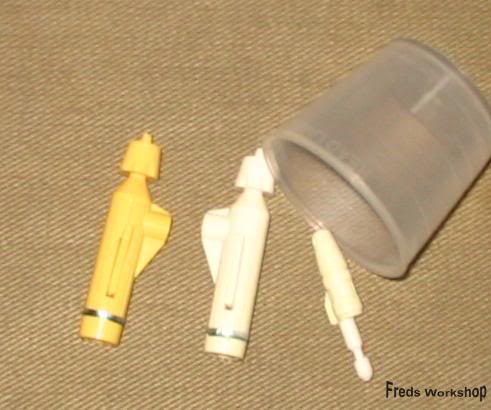
Saving TFs From Chrome-Flake: This came up first as a series of posts on the newsgroup by BW Sidecutter. A response to a second series of questions is posted here for your review. The post references Primal Prime, but can be applied to all TFs with similar vac-metal construction. The issue at hand is that these components suffer from fatal particle-flaking, not just from play, but from some type of percieved manufacturing defect.
|
|
There are many schools of thought on this, everything from throwing broken pieces of TFs into a garbage bag on the curb, to vaccum-sealing your packaged TF in a glass box. I've seen both extremes first-hand, and let me tell you, it's not pretty. There really is no "best" method to storing TFs, it's more like what works best for you. I'm just listing them here for you, and you can pick what level of care is for you. These methods work equally well for loose or packaged TFs. The one thing I cannot stress enough is LIGHT and TEMPERATURE control!! The sun, and alternating temperatures take a toll on your tfs. I've seen so many yellowed jetfires in my day, it makes me want to cry. And let's keep those TFs in a room that stays one temp the entire year round, OK? This doesn't mean your attic, or your garage. It means your home. Plastic gets old and brittle, and metal corrodes, after all. I recommend keeping them between 62 and 72 degrees farenheit. No more, no less. As for the rest, read on! Method #1 - Vaccum-Sealing: This method is only available if you live or work where you have access to some pretty sophisticated equipment; or you stay up all night watching infomercials. One method involves getting a contractor to build you a heavy-gauge enclosure, sealed on all sides, and install a small fitting on one corner. Then run to the lab, and have all the air pumped out of the container. Viola! Instant vaccum, and your TF is free from dust and wind forever. Please note that you must put the tf IN the box before you have it sealed. I recommend you have the container built out of glass so you can look at it, because you're certainly not getting it out anytime soon. A more inexpensive method is buying a few of those cool bags that get the air pumped out by using your vaccum cleaner. Cheap, easy! Just not very displayable, or very durable. In fact, it has a tendency to crush delicate packages, so I recommend it only for loose TFs. I'll bet a lot of you read the above section and laughed. And you're right; it seems patently silly to a lot of people. Now think about afa-graded figures. See any similarities? ;-) Method #2 - The "Pad and Crate" Method: This is simple enough, and applies to both loose and packaged TFs. A box, and some packing material, right? WRONG! Your choice of packing materials is VERY important! Some newspaper and a cardboard box thrown on your basement floor doesn't cut it if you're looking for durable, long-term storage. This is too susceptable to damage. If you insist on the basement, then boxes need to be kept at least 6 inches off the ground; more if you live in a flood plain. A shelving unit is a must. What do I use? Heavy-duty reinforced metal shelving, bolted to the wall for extra durability. And heavy-duty, non-acidic plastic rubbermaid 20-gallon crates with hinged lids. A good box isn't enough. The right packing materials are essential. For loose ones, seal the TF in a plastic bag, accs seperate. None of that banging, scraping crap. Then, wrap the ziplock bag in bubblewrap. At least two times fully around. It would be nice to fill the entire crate with this stuff, but to save costs, You can use foam peanuts. Save the newspaper for your fish. For boxed materials, the same thing applies. Wrap the boxes in bubblewrap, taking care to protect the corners, as well as keep from denting them. One other thing? If you have access to professional-quality archival materials and chemicals, use them. Ask at your local library or historical society. They'll point you in the right direction. And as always, I recommend against the basement or attic, but if you must, install a dehumidifier! This will definately make a difference... I need to devote a small section to specifically blistercards. As I mentioned in the packing section about padding and crating...they do offer products such as clear plastic containers designed specifically for blistercards. Usually used for the small star wars action figures, they also fit the small (basic) carded TFs. There is a special size you can order to fit the deluxe carded TFs; this is the same size that holds Turtles and Thundercat figures. That size hold both a deluxe transmetal rattrap, and a targetmaster landfill.
Not only are these clear plastic containers good for packing, they are good for displaying product while keeping it dust and dent free. You can also pack them away in these containers, but they take up more room that simply packing the blistercards the way they come shipped in cases; stacked opposite of each other, with thin padding seperating each card so as not to scrape the bubble. Thicker padding on the outside edges. Simple as that. |
|
As per several requests I've recieved recently, I've decided to go ahead and share my thoughts on the storage of transformer paperwork and accessories. I've talked about the storage of whole boxes, and in the last section, I mentioned merely that I store these items seperate from the loose TF, but I ever went into much detail on the subject. Until now! Read, and enjoy. Storing Paperwork (Non-Comic):
Storage of PaperWork (Comics): Simple, and fun, everybody knows how, so I'll be brief. Comic bags, and a cardboard backer. You can store them in comic boxes, or binders. Your local comic book store will have everything you need to get started on this project. Need to know more? Just ask! I can expand this section if needed. Just stop leaving them out loose, and reading them with greasy fingers. Storage and Care of Videos: Videos? To tell you the truth, I'm not a big fan of analog magnetic recording mediums. Picture iron shavings sprinkled on a piece of scotch tape, and you have pretty much described tape. Suseptible to magnetic decay from everything from refrigerator magnets, television monitors, even the earth's magnetic field to a lesser extent. It's why I still don't own a decent set of episodes. After 20 years of use, most tapes look pretty crummy. To get maximum life out of tapes, store in a cool, dark, dry place, and never play them. Make a 'play-copy' off your set of originals. That's what TV stations do; they have a climate-controlled vault, and use copies. This assumes you have a decent master copy to begin with, either a broadcast copy or a new release. Otherwise, your playcopy will look lousy. Unlike digital recording medium, which makes identical copies, you lose picture and sound clarity with each succeeding generation of analog copy. To make the analog playcopies last, make sure your player has a smooth, clean head on it. Make sure to degauss it on a regular basis. This will extend the life of the tape. Rewinding the tape completely after each use will help as well, as it will keep the tape from stretching out. You say you've snapped a tape? All is not lost. I repair these all the time. Most videocassettes unscrew easily. If the break is at either end of the spool, great! Pop off the lock on the spool, re-thread the tape, and reassemble the cassette. If you were careful not to dent the tape, there should be no loss in play quality. If the break was in the middle...well, you can fix it with something as simple as video repair tape, but a 'hit' will show up on the tape, with accompanying momentary loss of tracking. It's the price you pay for a repair to the tape... The best solution of all would be to get all the episodes digitized, and record them to a cd/dvd. I don't know if they will ever release them commercially like this (lol), and I don't know if you want to spend the money to have them recorded this way yourself...but it's the best way. Barring imperfections on the cd surface during manufacture (rainbow discoloration, referred to as oxidation) you could record to a cd and play it forever. The rest of your life. Isn't that worth the extra cost? It would be to me...as soon as a site offers all the episodes digitized on a website, I'll spring for the cable modem (a 'big' pipe) and download them all to a cd. Until then...do what you can to preserve your tapes. I have a feeling they'll need to last awhile... (Can you tell this was written years before rhino released everything on dvd?) Storing of Accs: This one has a lot of people clamoring for advice. Everyone wants to avoid breaking the more delicate guns and missles, and of course avoid any chrome deterioration. Here's a look at some methods that have worked for me: Keep in mind that this is advice for personal collection items. If you're storing accs for sale or trade, simply buy a ton of those clear tackle boxes from Walmart, or some other store. They work great, and keep things from spilling. As for your personal collection, read on:
|
|
The way we've all done it for years, of course is to take them out of the boxes, transform them into their coolest mode, and placed them either on a shelf at home, or on top of the computer monitor at work. This would be considered the "standard" approach. Not bad, as you have ready access to the toy to play with it. :-) On the down side, there's dust and accidental breakage to consider...not to mention light and temperture damage, which I complain about all the time. :-) |
|
Not so much a "new" approach, as is is more of a "mature" approach to the display of your TF. As we get older, we're less likely to have them out to play, and more likely to store them away until we die and our grandchildren sell them for a pittance. The new approach is already widely in-use in a variety of formats, both boxed and loose. First and foremost, display cases, or shelves with glass/plastic doors/fronts are becoming the norm. Keeps the toy safe and dust-free, while compromising little in viewing pleasure. The method I have in-use for my loose toys in one particular room, for example, is a series of antique lawyer's bookshelves. Sturdy, with nice glass fronts, and they match the decor of the den very well. After all, keeping with the enviornment makes for the whole display. In a more modern room, say the living room, an all-glass, clear display case with brass trimming works well. With the added viewing angles, you can actually fit more into the case for viewing without having the "cluttered" look. Did I happen to mention? Keep the room dark. At least keep the cases out of direct light. Trust me: this is important. I recommend room-darkening blinds or draperies. Of course, I actually nailed my windows shut in my tf room, but that's another story...hell, ask me what I am doing for the new house. :-) Yep...window tint. So now that we've covered loose toys, what about boxes? Well, to tell you the truth, unless you have only a very few small boxes to display, you won't be able to make them blend in with the rest of the decor in your home. You'll need to set aside an entire room for a full box-style display.But chances are, if you're a rabid fan of the line as I am, you'll already have a TF room, or plans to make one. :-) There's a couple different routes to go with these. One idea is to simply buy some cheap shelving from shopko (the kind with the fake wood look) and set all your boxes in it with the sides of the boxes facing you, in "book" fashion. It's nice, neat looking, and uses a minimum amount of space for a box-display, but I find that it loses some of the impact for display; you are not seeing the bulk of the boxart on the front, nor the toy itself.
My preferred method is to skip the pre-fab shelving units, and custom-build floor to ceiling wodden shelves that attach directly to the wall. Stain to match the decor! The shelving is designed to be adjustable, so I can customize my display to fit any size box. If you're not into sawing your own wood, you can buy these setups complete from any lumber-type store. The downside? This not only takes up a lot of space, but it also leaves the boxes open to dust, and possible damage if you have animals or small children. Which brings us to the final method. |
|
Professional-quality cases. These are the big, all-glass constructs with locked fronts that you see everywhere, in different shapes and sizes. A wonderful, lighted, dust-free enviornment. And you can showcase boxes on all 4 sides! I use one of these for overly large, loose TFs as well as boxed ones. The downsides? For one, they cost a LOT. Also, this is NOT something you can move around yourself. It gets delivered, and set up by the company. Where they put it is where it stays. Period. They are simply too-heavy.
Now, all this being said...when you get to the point of having so many TFs (or at least, ones you like so much) that you're resorting to the methods above, well...I think it's time to re-evaluate your priorities. These started out as toys, yet our nostalgia and consumer culture has raised them to the point of being collectible pieces of art. You *can* choose to do them this way. Or you can weed back down to basics. Not sure what I'm talking about? Not a problem, as you'll find all the articles about that project here. Enjoy! |
|
I have a LOT of thoughts, actually, but here's the first one: leave the parts intact. That is, if you are assmebling a kitbash character from various but intact pieces of vintage TFs, try not to overly-modify them. You never know when that part will come in handy someday. I know, this interferes with the more artistic among us, but I've had the good fortune of disassembling some kitbashes of mine to trade the parts to further my collection! Of course, I don't follow my own advice alot of times...and if the unit is already trashed, who cares! Go nuts! Lately, I've been more into kitbashing new TFs when they come out. That way, I don't feel guilty when I wreck it...there's a million more on the shelves right now! I'm a big fan of glues...specifically, the cheap walmart-brand crazy-glue. It bonds quickly, and leave no chemical residue. This is far superior to model cement, which runs, and doesn't hold very well. On the upside, it does clean up better if you want to take apart the kitbash later. Model cement will dissolve fairly quickly. That's the scoop on using vintage bits in your sculptures. Obviously, these days a lot of that is a moot-point; we buy two or three of something at mass-retail (say, an Alternators Sideswipe) and modify it accordingly. Since there's so much product around, and it will never amount to any real value anyways...well, cut and chop away! :-) Hehe.
Something else I've learned at the various BotCons? (At least for me.) Anything serious that I put a lot of work into will not get noticed. I spent 20 hours on a jetfire repaint, and no one looked at it. I spent 20 SECONDS on "toiletbot", and I got featured in both Toyfare, and Lee's Action Figure News. Funny and quick seem to work for me. To see a pic of this "winning" bot from 99, and all of my other winning kitbashes from 2000, check out my Customs Page. |
|
The crumbling of our beloved toys has been an ongoing discussion for a lot of people. We want ways to prevent it, but we didn't have all the information. Just how long do we have before our transformers turn to dust? Should we sell our toys now? Play with them as much as possible? Or seal them up in a cave? The most common questions I hear are, "What's going on with my transformer? Why has it become brittle?" I've spoken with plastic and chemical engineers (a number of them are transfans, after all) and have collected some of their ramblings here. Hopefully, their responses will be as helpful to you as they were for me.
|
|
So there you have it, folks! A bright ray of hope for those fanatical collectors out there, that your toys may yet last your lifetimes. And a stern word of caution to others, to enjoy your toys any way you see fit...while you can. Ashes to ashes, dust to dust. May your luster never dull, and your wires never cross. Until all are one. Er, ahem.
Got news on related topics? Something that worked for you? Let me know! I'll try it, and post it here! I love new ideas. |
 |